Embarking on the journey of hatching chicks from eggs is a fascinating endeavor that offers a glimpse into the miraculous world of life’s beginnings. As a hatchling enthusiast, you’re not just a caretaker but also a witness to the intricate process of embryo development. One crucial technique that plays a pivotal role in this process is candling eggs. In this comprehensive guide, we will delve into the art and science of candling eggs, exploring its significance, step-by-step instructions, necessary tools, what to observe, risks to avoid, and even how to involve kids in this captivating process.
What is Candling Eggs and Why is it Important?
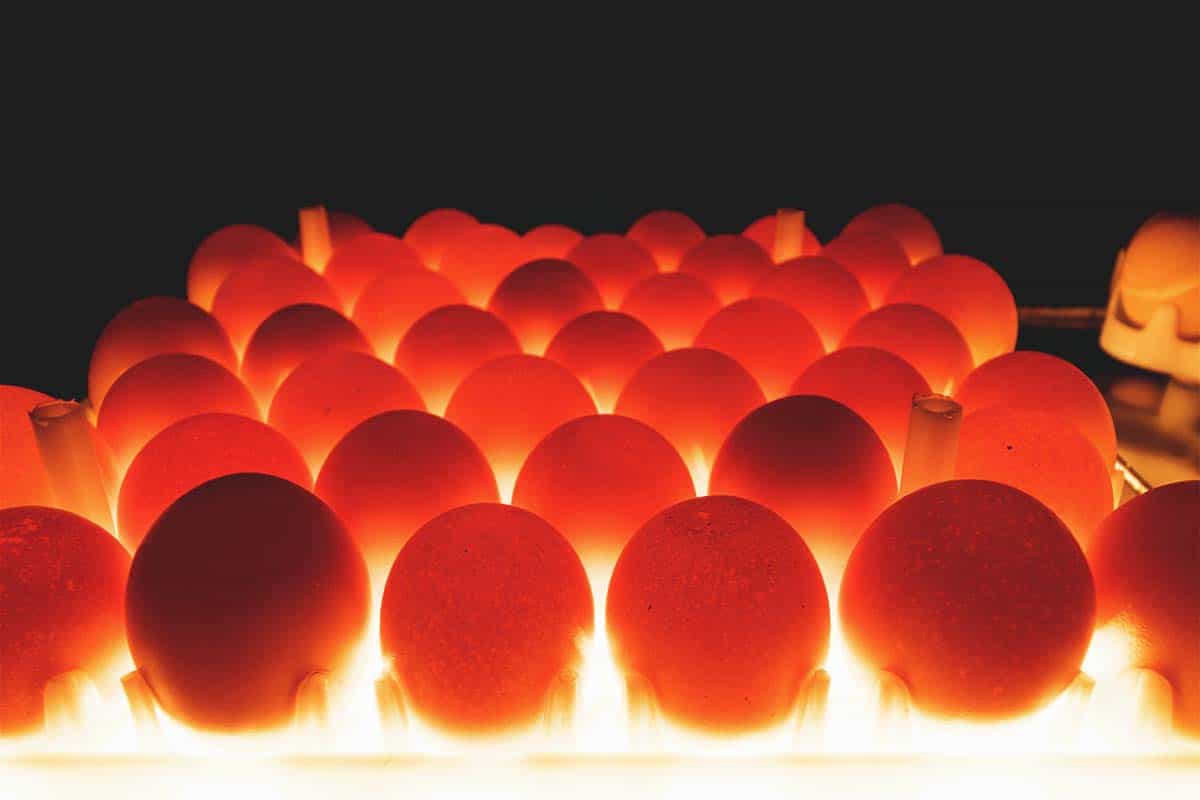
Imagine peering into the secrets hidden within an eggshell, witnessing the early stages of a chick’s formation before it even breaks free. Candling eggs offers just that opportunity. Candling is the practice of shining a bright light through an egg to observe its internal contents. It serves as a window into the egg’s development, providing valuable insights that impact the success of hatching.
Candling eggs is a vital step in the egg incubation process. It allows you to evaluate the fertility of eggs, monitor embryo development, and identify any potential issues that might hinder a successful hatch. By candling eggs, you gain the ability to make informed decisions throughout the incubation journey, ensuring that only healthy and viable embryos continue their development.
Candling Eggs: Step-by-Step Guide
Candling eggs may sound like a sophisticated process, but it’s actually quite simple and can be done with minimal equipment. Here’s a step-by-step guide to help you get started:
Step 1: Choose a Dark Room Find a quiet and dark room where external light won’t interfere with your observations. This enhances your ability to see the egg’s contents clearly.
Step 2: Gather Your Tools Collect the necessary tools for candling. A candling lamp, flashlight, or LED light can serve as your light source. These options offer ample brightness without generating excessive heat that could harm the embryo.
Step 3: Position the Egg Hold the egg gently and position it over the light source. You can use a stable surface or your hand to support the egg.
Step 4: Observe the Contents As you shine the light through the egg, observe the internal contents. You’ll notice the outline of the air cell, which appears as a circular area at one end of the egg. Additionally, you’ll see the embryo’s development stage, which changes over time.
Step 5: Document Your Findings Make note of your observations, documenting the size of the air cell and the appearance of the embryo. These findings will help you track the progress of each egg and make informed decisions during incubation.
Candling is typically performed on specific days of incubation to assess the embryo’s development. The frequency of candling varies based on the species of poultry and the specific incubation guidelines you’re following. As you become more experienced, you’ll develop a keen eye for interpreting the egg’s contents during different stages of incubation.
Tools Needed for Candling Eggs
Before you embark on your egg candling journey, it’s essential to gather the right tools. Having the appropriate equipment ensures accurate observations and a successful candling experience. Here’s what you need:
1. Candling Lamp, Flashlight, or LED Light: Select a reliable light source that provides sufficient brightness without generating excess heat. Dedicated candling lamps are designed for this purpose, offering consistent lighting for clear observations. Flashlights and LED lights are also suitable alternatives, but ensure they’re not too intense to avoid overheating the egg.
2. Dark Room or Enclosure: Creating a dark environment is crucial for effective candling. Choose a quiet room where you can control the lighting conditions. Closing curtains or using a box to enclose the light source and egg can help prevent external light interference.
What to Look for During Candling
Candling eggs is not just about observing the egg’s contents; it’s about interpreting the signs that provide valuable insights into the egg’s development. Here’s what you should be looking for during the candling process:
1. Air Cell: The air cell is a crucial indicator of an egg’s age and fertility. As the egg incubates, the air cell grows larger. Its size can help you estimate the egg’s age and assess its freshness. A larger air cell might indicate an older egg, while a smaller one suggests a fresher egg.
2. Embryo Development: The embryo’s development stages are visible as dark shadows within the egg. Over time, you’ll observe changes in the embryo’s appearance, including the formation of blood vessels, the embryo’s movement, and the development of recognizable features. Understanding these stages allows you to track the embryo’s progress and intervene if necessary.
3. Fertility and Abnormalities: Candling also helps you determine whether the egg is fertile and whether the embryo is developing correctly. A fertile egg might show signs of embryo growth, while an infertile egg remains clear. Be on the lookout for abnormalities such as blood rings, which indicate an unsuccessful development, or detached embryos that may need attention.
Risks of Incorrect Candling Eggs and How to Avoid Them
While candling is a valuable tool, incorrect techniques can lead to unintended consequences. Understanding the potential risks and taking precautionary measures is essential to ensure accurate observations and the well-being of the developing embryo.
1. Egg Damage: Applying too much pressure or dropping the egg during candling can lead to cracks or damage, compromising the embryo’s environment and health. Handle eggs with care and gentleness to prevent accidental harm.
2. Embryo Disturbance: Excessive movement or sudden jarring while candling can disturb the embryo’s development. Ensure a stable environment and minimal movement during the process.
3. Misinterpretation: Misinterpreting the egg’s contents or stages of development can lead to incorrect decisions. Educate yourself on the signs to look for during each incubation stage, and consider seeking guidance from experienced hatchling enthusiasts.
Involving Kids in the Candling Process
Candling eggs isn’t just a scientific endeavor; it’s a captivating learning experience that can be shared with kids. Involving children in the candling process not only educates them about the wonders of embryonic development but also fosters a sense of responsibility and curiosity. Here’s how you can make candling a family-friendly activity:
1. Set the Stage: Choose a comfortable and darkened space where kids can gather around. Creating a cozy atmosphere enhances the intrigue and excitement of the candling process.
2. Explain the Process: Before you begin, explain to kids what candling is and why it’s important. Use simple language to convey the concept of shining light through the egg to see what’s inside.
3. Demonstrate Care: Show kids how to handle eggs gently and encourage them to handle them with care. This teaches them the importance of being gentle and respectful toward living things.
4. Share the Light: Let kids take turns holding the light source and positioning eggs for candling. This hands-on participation allows them to actively engage with the process.
5. Encourage Observations: Ask questions that prompt kids to observe and describe what they see. Encourage them to identify the air cell, embryo, and any other changes they notice.
6. Discuss Discoveries: After each candling session, gather to discuss the observations. Share your insights and invite kids to share their observations, fostering an open and curious conversation.
7. Document and Compare: Keep a journal or notebook to document the progress of each egg. Take photos of the candling results to compare changes over time. This documentation creates a tangible record of the egg’s journey.
Alternative Methods for Candling
While traditional candling methods involve specialized equipment, alternative methods can be equally effective and accessible. Here are a couple of options to consider:
1. Smartphone Flashlight: Using a smartphone flashlight can serve as a quick and convenient candling method. Hold the egg close to the flashlight and observe the contents in a dark room. This method works well for occasional candling sessions.
2. Homemade Candling Setup: Craft a homemade candling setup by creating a cardboard enclosure around the egg and positioning a flashlight underneath. This DIY solution can provide consistent lighting for observations.
Best Ways for Candling Eggs
Candling eggs is a journey into the hidden world of embryonic development, offering insights that nurture your understanding of the hatchling process. From assessing fertility to monitoring embryo growth, candling equips you with the knowledge to make informed decisions that contribute to a successful hatch. By involving kids in this mesmerizing activity, you create a shared experience that sparks their curiosity and connects them with the marvels of life. Whether you use a professional candling lamp or a smartphone flashlight, the process remains a magical window into the mysteries of the hatchling journey.
Related posts:
 How Chicken Eggs Are Fertilised
 Raising Baby Chicks with Kids: A Fun and Educational Guide
 Teaching Kids to Handle and Collect Eggs: A Guide for Success
 Teaching Kids Through Raising Chickens: Life Skills
 Choosing the Best Egg Incubator: Hatchling Success
 How Long Fresh Eggs Last: Collecting and Care Tips